Installation and Setup Guide for Pools
Instructions for Installing and Setting Up Zarfam Prefabricated Fiberglass Pools
- Site Evaluation
Before proceeding, a thorough assessment of the installation site must be conducted by experienced experts. This step plays a crucial role in minimizing installation costs and reducing project risks. Prior to the pool’s arrival, the expert should carefully review the following:
Ensure the installation site is within the owner’s property and does not interfere with neighboring properties.
Verify that the installation site does not conflict with water and sewage pipelines, power lines, or other building structures.
Take into full account the customer’s preferences regarding the pool’s location.
Confirm there are no issues with water supply routes for filling the pool.
Identify a safe and suitable path for transporting the pool via vehicles and cranes to the site for installation.
Ensure easy accessibility for future repairs of auxiliary equipment such as water filtration systems, heating systems, plumbing, and other attachments.
Verify the presence of a secure and suitable location for installing electrical equipment, with proper accessibility.
Pre-determine a location for depositing excavated soil, ensuring it does not obstruct the transport and installation of the pool. Additionally, after installation, ensure that the soil removal route does not block access to or from the pool area.
Consider the aesthetic aspects of the surroundings in consultation with the owner to ensure the landscaping aligns with their preferences, factoring in trees, plants, building design, sunlight access, privacy, and more.
- Excavation
Once the exact installation location is determined, follow these steps for excavation:
Based on the dimensions of the pool purchased by the customer, mark the outer corners of the pool using stakes. Use a measuring tape to precisely verify the distances between the marked points, ensuring the lengths, widths, and diagonals are equal. In other words, as shown in the diagram below:
Length 1 = Length 2, Width 1 = Width 2, and Diagonal 1 = Diagonal 2
After marking the exact dimensions of the pool on the ground, extend the outline by 0.5 meters on each side and mark the new boundary on the ground using chalk powder.
The marked area should be excavated to a depth of 20 cm below the nominal depth of the pool using appropriate tools. For example, if the depth of the pool from the highest edge to the bottom is 160 cm, the excavation depth should be 180 cm.
The excavated soil must be kept at least one meter away from the dug pit to avoid any issues during the installation process.
Note 1: If the pool is being installed in an area with space limitations, the side that is adjacent to a wall or the edge of the land should be excavated in accordance with these restrictions.
Note 2: If the pool is being installed in an area with unstable soil, the sides of the excavation must be brick-walled. Make sure that the wall is at least 30 cm away from the pool shell on each side.
- Preparing the Floor
First, level the bottom of the excavation and then compact it using a compactor or hand tamper.
For the preparation of the Zarfam pool, ensure that no manual soil or debris is placed under the pool.
Next, cover the bottom of the excavation with concrete of grade 250, applying a thickness of 15 to 20 cm.
Make sure that the cement surface is completely level and troweled smooth, with no unevenness. The leveling on the concrete surface should be done in such a way that when the pool is placed, the top edge of the pool aligns with the finished floor level.
- Pool Placement and Installation
Once the concrete floor has set and hardened, the pool should be carefully placed in its exact location using a crane and appropriate straps. Ensure that no stone or local height adjusters are used at a single point or side during leveling, as this may cause separation of parts of the pool floor from the concrete, leading to cracks and damage to the pool.
Very Important Note: The entire pool floor must sit evenly and completely on the concrete floor.
- Installing Pipes and Electrical Equipment
After placing the pool, connect the outlet pipes for filtration under the pool and under the skimmer to the installation site for the filtration equipment and pool inlet.
It is essential that the filtration equipment room is not located under the pool steps and must be positioned separately, with pipes connected accordingly.
The outlet pipes of the filtration system should be appropriately extended to the jet nozzles and connected.
Ensure sufficient use of Teflon tape and waterproof adhesive for connecting the fittings.
All connections should be tested with an appropriate method to ensure there are no leaks.
Electrical wiring for pool lights should be routed inside suitable conduit or tubing, extending to the lights. The wiring should be connected using appropriate connectors and completely insulated with varnish.
Note (Very Important): The input voltage for the lights is 12V, and a suitable adapter must be used. Never connect the lights directly to mains electricity.
Note: The use of a life protection switch in the control panel is mandatory.
- Filling Around the Pool
If the soil in the excavation site is a mixture of sand and gravel, not clay, it should be mixed with concrete grade 150, slightly moistened with water, and then gradually poured around the pool in 20 cm layers. Compact each layer as much as possible using a hand tamper. After spreading each layer, you may add some moisture if needed.
If the soil in the area is clay, the process should be done using a mixture of sand and gravel soil obtained from another location.
Since filling behind the pool causes pressure on the walls, to neutralize this pressure and prevent the pool walls from bulging, fill the inside of the pool with water corresponding to the amount of soil being added behind the wall at each stage.
For areas like beneath the steps or under the edges where there is a cantilever or reverse slope, fill with a mixture of sand, cement, and compress it. For the final fill in such areas, follow the injection method described below.
- Completing the Fill in Reverse Slopes and Edges with Cement Grout
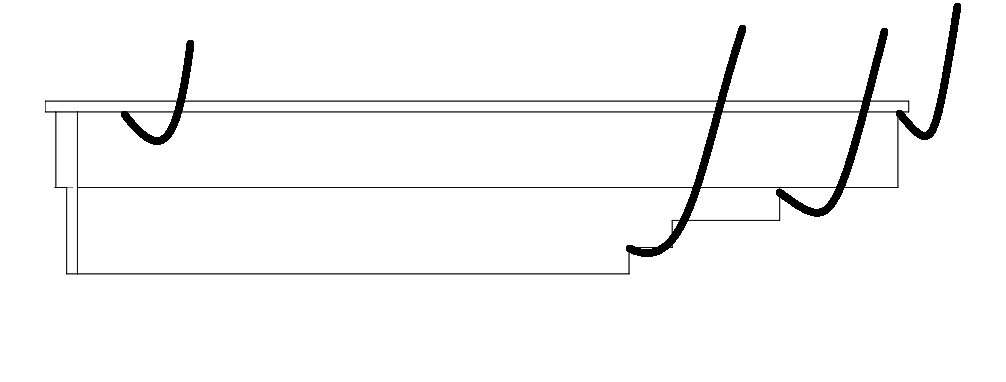
When filling with a mixture in areas like under the steps or beneath the edges with cantilever or reverse slopes, install several 0.5-inch polyethylene hoses, as shown in the diagram below.
After completing the backfilling and compaction, use a hose and funnel to inject the diluted cement grout into the designated areas until they are completely filled. This process helps prevent cracking due to empty spaces on the surface.
It is important to note that the backfilling should be done up to the level just below the finish floor level for cement, tiles, ceramics, or wooden flooring.